An encrypted password storage is well and good, but now that we have a working GnuPG setup, we should consider using PGP for what it was originally designed: email messages. To do this, we’ll be using Mutt.
Mutt is a console-based mail user agent, or MUA, designed chiefly for managing and reading mail. Unlike mailer programs like Thunderbird, it was not designed to be a POP3/IMAP client, or an SMTP agent, although versions in recent years do include this functionality; these are tasks done by programs like Getmail and MSMTP.
If like many people, you’re using Gmail, this works very well with POP3/IMAP and SMTP, enabling you to compose email messages in plain text with your choice editor in a terminal window, in a highly configurable environment, and doing your own email encryption for any sensitive communications in such a way that even your email provider can’t read it.
General usage of Mutt and setup for Gmail users is not covered in detail here, although it may be the subject of a later article. For now, there are many excellent articles on the basics of a Mutt setup. If you’re interested in the setup for other GNU/Linux mail clients like Claws or Thunderbird, Cory Sadowski has a very good article walking you through that, among other privacy settings relevant to both GNU/Linux and Windows.
All of the below is assuming you already have a GnuPG keypair ready,
with gpg-agent(1) running in the background to manage your keys.
Background
Most of the PGP setup guides for Mutt you can find online are quite old,
and they usually suggest a lot of lines of .muttrc configuration to interface
directly with the gpg command, with a myriad of options and some byzantine
variable substitution:
set pgp_clearsign_command="gpg --no-verbose --batch --output - ...
set pgp_decode_command="gpg %?p?--passphrase-fd 0? --no-verbose ...
set pgp_decrypt_command="gpg --passphrase-fd 0 --no-verbose --batch ...
set pgp_encrypt_only_command="pgpewrap gpg --batch --quiet ...
set pgp_encrypt_sign_command="pgpewrap gpg --passphrase-fd 0 ...
set pgp_export_command="gpg --no-verbose --export --armor %r"
set pgp_import_command="gpg --no-verbose --import -v %f"
set pgp_list_pubring_command="gpg --no-verbose --batch --with-colons ...
set pgp_list_secring_command="gpg --no-verbose --batch --with-colons ...
set pgp_sign_command="gpg --no-verbose --batch --output - ...
set pgp_verify_command="gpg --no-verbose --batch --output - --verify %s %f"
set pgp_verify_key_command="gpg --no-verbose --batch --fingerprint ...
I’m all for the Unix philosophy of using programs together, but this is just
too much. It’s a fickle setup that’s very hard to work with, and it requires
too much understanding of the gpg(1) frontend to use and edit sensibly. After
all, we want to end up with a setup that we understand reasonably well.
So, throw all that away; we’re going to use GPGME instead. The above is exactly the problem that this library is designed to solve; it’s a library to which applications can link to streamline the usage of GnuPG functions, including interfacing with agents. We can replace all of the above with this:
set crypt_use_gpgme = yes
Installation
If you have Mutt installed, odds are it already has a GPGME interface. You can
check if your current version of Mutt has GPGME powers by looking at the mutt
-v version output. Here’s the output of mine, using the packaged Mutt from
Debian GNU/Linux, which does have GPGME support:
$ mutt -v | grep -i gpgme
+CRYPT_BACKEND_CLASSIC_PGP  +CRYPT_BACKEND_CLASSIC_SMIME  +CRYPT_BACKEND_GPGME
upstream/548577-gpgme-1.2.patch
If you don’t have a version of Mutt with GPGME, you can build your own
by downloading the source and building it with --enable-gpgme:
$ ./configure --enable-gpgme
$ make
# make install
You may need to make sure you have the GPGME library and headers installed first:
# apt-get install libgpgme11 libgpgme11-dev
Setup
Add the following lines to your .muttrc file; remove anything else beginning
with crypt_* or pgp_*:
# Use GPGME
set crypt_use_gpgme = yes

# Sign replies to signed email
set crypt_replysign = yes

# Encrypt replies to encrypted email
set crypt_replyencrypt = yes

# Encrypt and sign replies to encrypted and signed email
set crypt_replysignencrypted = yes

# Attempt to verify email signatures automatically
set crypt_verify_sig = yes
Restart Mutt, and you should be ready to go.
Usage
First of all, check that you have the public key for your intended recipient available in your GnuPG keychain:
$ gpg --list-keys joe@example.com
If you’re able to download it from somewhere, a useful formula is to download
it with curl(1) and import it directly into gpg(1):
$ curl http://www.example.com/joe-somebody.asc | gpg --import
gpg: key 1234ABCD1234ABCD: public key "Joe Somebody <joe@example.com>" imported
gpg: Total number processed: 1
gpg:               imported: 1  (RSA: 1)
gpg: no ultimately trusted keys found
Remember, it’s your responsibility to decide how much you trust this public key; normally it’s best practice that you actually meet someone in person to exchange written key fingerprints in order to be completely sure that the key corresponds to that user.
If you don’t have anyone else you know using PGP to communicate with, you can
send me a message encrypted with my public key 0xC14286EA77BB8872 to
tom@sanctum.geek.nz. If you send or link me your public key in your message,
then I’ll reply to you with a message encrypted with your public key so you can
check everything’s working.
$ curl https://sanctum.geek.nz/keys/pgp/tom@sanctum.geek.nz.pub.asc | gpg --import
EDIT January 2024: Yes, this offer is still good; you can still email me if you want to test your new setup; I will still reply to you!
Back in Mutt, begin composing a message with m. Enter the recipient and
subject as normal, and compose your message. When you’ve finished writing and
save and quit $EDITOR, and your message is in the Compose screen waiting to
send, press p to bring up the PGP menu at the bottom:
PGP (e)ncrypt, (s)ign, sign (a)s, (b)oth, s/(m)ime or (c)lear?
We’ll press b to both sign and encrypt the message.
If you want to be able to read the message after sending, then you’ll need to
arrange to encrypt it with your key as well as the recipient’s. I find the
cleanest way to do this is to add your address to the Bcc: header with b.
You can also set this as a default with the following line in
~/.gnupg/gpg.conf, where 0x1234ABCD1234ABCD is the short ID of your own key:
encrypt-to 0x1234ABCD1234ABCD
When you send the message with y, you might need to specify which key you
want to use for each recipient, if you don’t have a unique key on your keychain
with your recipient’s email address.
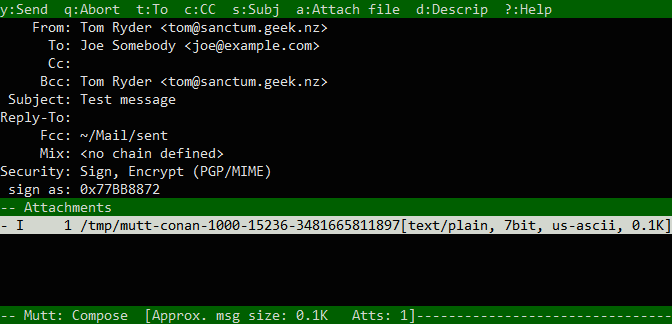
When you send, you should be prompted for your passphrase by your PIN entry
program, unless your agent is already holding the key for you. This is needed
in order to sign the message. When you’ve provided this, the message will be
sent, and if you included yourself in the Bcc: field, you should be able to
read it in your sent mail, with some headers showing the PGP information
(whether the message was signed, encrypted, or both):

Your recipient will be able to decrypt the message in their mail user agent with their private key, and nobody else but the two of you will be able to read it. Note that this works for any number of recipients, as long as you have a public key for each of them.
Keep in mind that the metadata of the message, such as the sender and recipient name and address, date and time it was sent, and (importantly) the subject, are sent in plain text. Only the body of the message (including attachments) is encrypted.
Useful extras
With GPGME, Mutt tries to use the first secret key available to it in its
private keychain. If you want to use some other specific keypair for signing
messages, you can specify that with with the pgp_sign_as option in .muttrc:
set pgp_sign_as = 0x9876FEDC9876FEDC
If you’d like to automatically sign all of your outgoing mail, you can set the
crypt_autosign option:
set crypt_autosign = yes
The first batch of options we set earlier will already automatically sign and/or encrypt messages in responses to messages doing either/both.
If you’d like to include a link to your PGP key in the headers to each message,
you can add a custom header with my_hdr:
my_hdr X-PGP-Key: https://sanctum.geek.nz/keys/pgp/tom@sanctum.geek.nz.pub.asc
All of this combines with Mutt’s extensive speed and high-powered configuration to make Mutt a very capable and convenient PGP mail client. As always, the more people you know using PGP, and the more public keys you have, the more useful this will be.