PuTTY is a terminal emulator with a free software license, including an SSH
client. While it has cross-platform ports, it’s used most frequently on Windows
systems, because they otherwise lack a built-in terminal emulator that
interoperates well with Unix-style TTY systems.
While it’s very popular and useful, PuTTY’s defaults are quite old, and are
chosen for compatibility reasons rather than to take advantage of all the
features of a more complete terminal emulator. For new users, this is likely an
advantage as it can avoid confusion, but more advanced users who need to use
a Windows client to connect to a modern GNU/Linux system may find the defaults
frustrating, particularly when connecting to a more capable and
custom-configured server.
Here are a few of the problems with the default configuration:
- It identifies itself as an
xterm(1), when terminfo(5) definitions are
available named putty and putty-256color, which more precisely define
what the terminal can and cannot do, and their various custom escape
sequences.
- It only allows 16 colors, where most modern terminals are capable of using
256; this is partly tied into the terminal type definition.
- It doesn’t use UTF-8 by default, which should be used whenever
possible for reasons of interoperability and compatibility, and is
well-supported by modern
locale definitions on GNU/Linux.
- It uses Courier New, a workable but rather harsh monospace font, which
should be swapped out for something more modern if available.
- It uses audible terminal bells, which tend to be annoying.
- Its default palette based on
xterm(1) is rather garish and harsh; softer
colors are more pleasant to read.
All of these things are fixable.
Terminal type
Usually the most important thing in getting a terminal working smoothly is to
make sure it identifies itself correctly to the machine to which it’s
connecting, using an appropriate $TERM string. By default, PuTTY identifies
itself as an xterm(1) terminal emulator, which most systems will support.
However, there’s a terminfo(5) definition for putty and putty-256color
available as part of ncurses, and if you have it available on your system
then you should use it, as it slightly more precisely describes the features
available to PuTTY as a terminal emulator.
You can check that you have the appropriate terminfo(5) definition installed
by looking in /usr/share/terminfo/p:
$ ls -1 /usr/share/terminfo/p/putty*
/usr/share/terminfo/p/putty
/usr/share/terminfo/p/putty-256color
/usr/share/terminfo/p/putty-sco
/usr/share/terminfo/p/putty-vt100
On Debian and Ubuntu systems, these files can be installed with:
# apt-get install ncurses-term
If you can’t install the files via your system’s package manager, you can also
keep a private repository of terminfo(5) files in your home directory, in
a directory called .terminfo:
$ ls -1 $HOME/.terminfo/p
putty
putty-256color
Once you have this definition installed, you can instruct PuTTY to identify
with that $TERM string in the Connection > Data section:
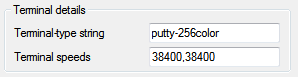
Here, I’ve used putty-256color; if you don’t need or want a 256 color
terminal you could just use putty.
Once connected, make sure that your $TERM string matches what you specified,
and hasn’t been mangled by any of your shell or terminal configurations:
$ echo $TERM
putty-256color
Color space
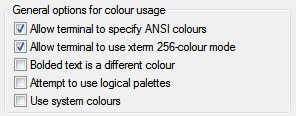
Certain command line applications like Vim and Tmux can take advantage of
a full 256 colors in the terminal. If you’d like to use this, set
PuTTY’s $TERM string to putty-256color as outlined above, and select
Allow terminal to use xterm 256-colour mode in Window > Colours:
You can test this is working by using a 256 color application, or by trying out
the terminal colours directly in your shell using tput:
$ for ((color = 0; color <= 255; color++)); do
> tput setaf "$color"
> printf "test"
> done
If you see the word test in many different colors, then things are probably
working. Type reset to fix your terminal after this:
$ reset
Using UTF-8
If you’re connecting to a modern GNU/Linux system, it’s likely that you’re
using a UTF-8 locale. You can check which one by typing locale. In my case,
I’m using the en_NZ locale with UTF-8 character encoding:
$ locale
LANG=en_NZ.UTF-8
LANGUAGE=en_NZ:en
LC_CTYPE="en_NZ.UTF-8"
LC_NUMERIC="en_NZ.UTF-8"
LC_TIME="en_NZ.UTF-8"
LC_COLLATE="en_NZ.UTF-8"
LC_MONETARY="en_NZ.UTF-8"
LC_MESSAGES="en_NZ.UTF-8"
LC_PAPER="en_NZ.UTF-8"
LC_NAME="en_NZ.UTF-8"
LC_ADDRESS="en_NZ.UTF-8"
LC_TELEPHONE="en_NZ.UTF-8"
LC_MEASUREMENT="en_NZ.UTF-8"
LC_IDENTIFICATION="en_NZ.UTF-8"
LC_ALL=
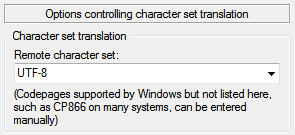
If the output of locale does show you’re using a UTF-8 character encoding,
then you should configure PuTTY to interpret terminal output using that
character set; it can’t detect it automatically (which isn’t PuTTY’s fault;
it’s a known hard problem). You do this in the Window > Translation
section:
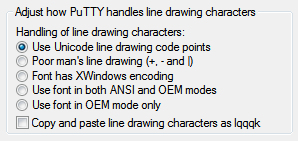
While you’re in this section, it’s best to choose the Use Unicode line
drawing code points option as well. Line-drawing characters are most likely
to work properly with this setting for UTF-8 locales and modern fonts:
If Unicode and its various encodings is new to you, I highly recommend Joel
Spolsky’s classic article about what programmers should know about both.
Fonts
Courier New is a workable monospace font, but modern Windows systems include
Consolas, a much nicer terminal font. You can change this in the
Window > Appearance section:
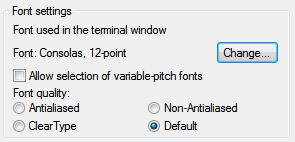
There’s no reason you can’t use another favourite Bitmap or TrueType font
instead once it’s installed on your system; DejaVu Sans Mono,
Inconsolata, and Terminus are popular alternatives. I personally
favor Ubuntu Mono.
Bells
Terminal bells by default in PuTTY emit the system alert sound. Most people
find this annoying; some sort of visual bell tends to be much better if you
want to use the bell at all. Configure this in Terminal > Bell:
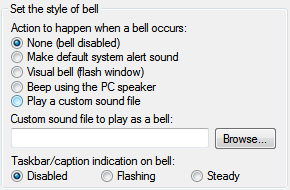
Given the purpose of the alert is to draw attention to the window, I find
that using a flashing taskbar icon works well; I use this to draw my attention
to my prompt being displayed after a long task completes, or if someone
mentions my name or directly messages me in irssi(1).
Another option is using the Visual bell (flash window) option, but
I personally find this even worse than the audible bell.
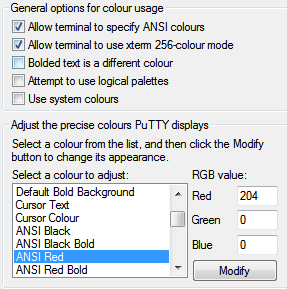
Default palette
The default colours for PuTTY are rather like those used in xterm(1), and
hence rather harsh, particularly if you’re used to the slightly more subdued
colorscheme of terminal emulators like gnome-terminal(1), or have customized
your palette to something like Solarized.
If you have decimal RGB values for the colours you’d prefer to use, you can
enter those in the Window > Colours section, making sure that Use system
colours and Attempt to use logical palettes are unchecked:
There are a few other default annoyances in PuTTY, but the above are the
ones that seem to annoy advanced users most frequently. Dag Wieers has
a similar post with a few more defaults to fix.